[Edit: The only question mark on this method is if QT Alternative is legal. I can't find an answer so maybe my earlier posts are still valid! To be safe, I've uninstalled QTA and am using my frameserving method!]
After that long clever (;)) post on frameserving and such like I've discovered a much easier way to encode mov files in WME! Amazing there is nothing on this on the web I could find.
The issue was that M/soft Directshow didn't support the Quicktime format and that's what Windows Media Player and WME use for importing video files.
Well I stumbled across this free Quicktime Alternative which comes with Quicktime Directshow filters! So download and install it (the lite version will do unless you want the Media Player Classic). If you have Quicktime installed it'll tell you to uninstall it - I didn't want to since I've paid for the Pro version and it's very handy. I went ahead and it cleverly only offers to install the Directshow filters which is perfect. So go ahead and then you'll find you can play Quicktime files in WMP and more importantly you can convert them to wmv using WME just as you would any other file!
Well I really hope that is my last post (and method) for converting Quicktime files to wmv files!
Friday, 13 July 2007
Semi-automated method of converting mov to wmv
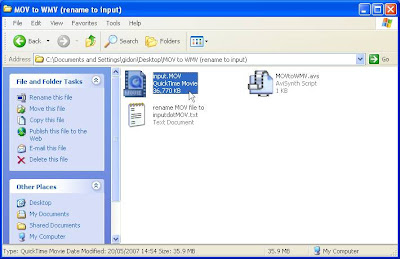
In my last post I talked about how to use Avisynth to convert mov files to wmv files with WME. Will here's a few tips to make the process easier. First create a folder on your desktop named something like "MOV to WMV (rename to input)". In it put an avs file like the one below - or if you're following along this one. Now create a shortcut to this folder in "send to" by typing "sendto" in the run box and creating the shortcut in the folder that pops up.
I'm using Elements 5 organizer for my photos and video clips. Find the mov file you want and hit the folder icon in the properties ("reveal in Explorer"). Now right-click the file and send it to the desktop folder.
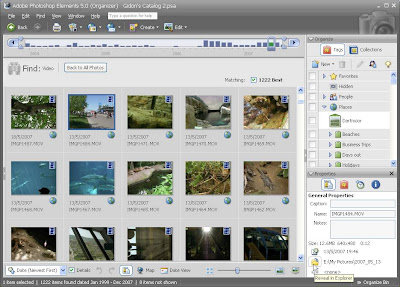
Now in the desktop folder copy and paste the file and rename the copied file "input.MOV". Now download this this settings file and save it in the desktop folder you created. Double click in it and it should load WME with all the right settings (if you're following along and are called gidon ;)). Now hit "encode now" and you should end up with your converted "output.MOV". I rename this to the original filename now with a wmv extension (using the original file for reference). Now I move this file back to the original folder and delete all the video files in the desktop folder. Simple ;)!

Quicktime (mov) to Windows Media Video (wmv)
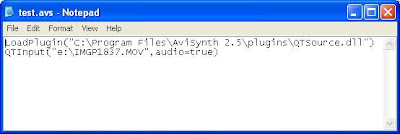
WME doesn't import Quicktime files directly unless they use a cross platform codec like Cinepak or Indeo (and generally they don't). I've mentioned a couple of workarounds earlier - involving uncompressing the QT file to an uncompressed avi. This requires a large chunk of disk space and an additional step. I've found another method which sounds a little complicated but isn't :). We're going to "frameserve" the file to WME. Don't worry what that means; download Avisynth and install it. Now download this Quicktime Import Filter and copy the dll to the plugins folder where Avisynth is installed. Now create a text file with the following text and save it with a .avs extension. You can download this one if you like. Edit the location of the QTsource file and the file you want to convert:
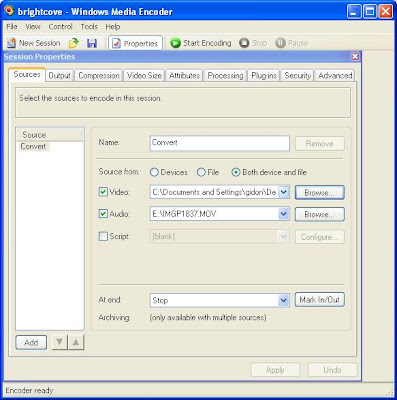
Now load up WME and start create a convert session but don't worry about the settings. In the sources tab select "Both device and file" from "Source from" as below (a strange quirk in WME means you have to do this - I don't understand why) and select the avs file for the video. Accept the same file for the audio if you have Quicktime v.7 installed but if like me you don't have QT 7 and have QT 6 (you need to have at least this), select the original Quicktime file as the audio source. This is because the current version of QTsource doesn't support audio unless you use QT v.7.
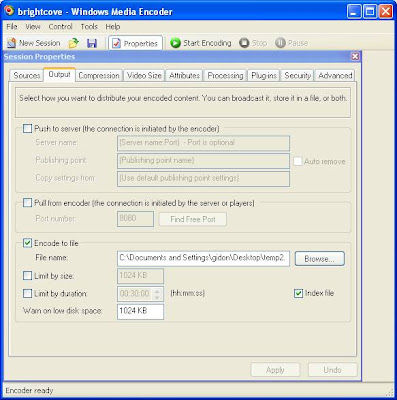
Now select the output file as below:
And then your encoding parameters as below:

And then run the encoder. It takes a little longer than usual but it works fine for me. And once you've done it once it's very easy to do it for another file.

Now load up WME and start create a convert session but don't worry about the settings. In the sources tab select "Both device and file" from "Source from" as below (a strange quirk in WME means you have to do this - I don't understand why) and select the avs file for the video. Accept the same file for the audio if you have Quicktime v.7 installed but if like me you don't have QT 7 and have QT 6 (you need to have at least this), select the original Quicktime file as the audio source. This is because the current version of QTsource doesn't support audio unless you use QT v.7.

Now select the output file as below:

And then your encoding parameters as below:

And then run the encoder. It takes a little longer than usual but it works fine for me. And once you've done it once it's very easy to do it for another file.
Thursday, 12 July 2007
Comparing video encoding
[Edit - it's not a big deal but looking more carefully at the MOV files from my camera the audio quality is very low - turns out to be 8Khz, 8bit uncompressed. Selecting this for the encoding does knock a small bit of the file size. Since you're not gaining anything by encoding any higher than this. But we're only talking about 120k on a file this size. It would of course me more significant on a longer clip ... And if we're encoding a DV capture - you would want to encode the audio at a decent quality. So I'd tend to leave eveything as is - at least then you can use the same settings for all your encodings (although be careful if you change the size - with the WME settings I've used it won't matter, but with the others you'll have to up the video bitrate a bit.]
Most of the stuff on the web talks about encoding DVD's to divX or xVID. But often I'm just trying to encode video for the web. Sites like the ones I've talked about earlier.
It's difficult to make a choice on the best codecs and settings to use. Of course you can just upload the files as they are if they are from your digital camera - although they may be a little big and for sites that don't convert them they may not stream properly. (Eg my camera takes Quicktime movies - but they aren't enabled for streaming no Hinted Streaming. So if you share them on the web, the whole file is downloaded before they play).
Plus I often capture some DV footage off my camcorder and want to make a clip to share with friends and family. So I decided to do some very un-scientific tests! It's quite difficult to do this keeping all factors the same - for example video / audio bitrate, key frame interval and audio quality, but it's gives me a rough idea. Of course then's there system compatability factors - whether it'll play on Mac's, whether you need to download an additional codec etc etc.
I'm using a Quicktime file off my digital camera which is 15s long. The original file is 640x480 and 15MB. Pretty large for a 15s clip I think you'll agree! First off I'm using Quicktime Pro 6.5 to transcode it to something smaller. For all the clips I'm aiming to end up with a 2MB file which equates to around 1Mbps bitrate.
So in Quicktime I tried a few setting and ended up with selecting ExportMovie to Quicktime MovieUse LAN and then changing the size to 480x360:
To see how it all turned out see the link below:
http://blip.tv/file/300616
(select the various encodings from the drop down box below the video - including the 15MB source file.)
They is a difference between all the streams. Personally I think the Flash encoding looks the worst with some horrible blocking when there's any movement. But the image does look quite clean and sharp. Next up for me is the Quicktime file. It's pretty good - but it does require having Quicktime Pro (around $30 when I bought it). But I think the quality of the Windows Media Encoding is the best. No noteable artifacts - very nice.
However, everything comes at a price. Windows Media Encoder is free but doesn't accept Quicktime files. You need to uncompress them. If you don't have Quicktime Pro you can use the free Rad Video Tools to de-compress the file and then load it into WME. Plus the encoding took 40s for a 15s clip on my PC (Athlon 3000, 1GB RAM). Quicktime is quite nice and easy to use for this clip - but also pretty slow - also 40s. The quickest by a long stretch is Flash encoding - at 8s!!
And then there's the audience viewing your creations - I happen to know most people I send clips of family to have Windows PC's and therefore my encoder of choice is WME. But I'd probably always try to include a Flash encoding too to be safe. Using something like Blip.tv - it's very easy to have mutliple version. And I could have just uploaded the source file and let it encode the Flash file for me. As I've mentioned though - none of the video sharing sites I could find had decent privacy settings to unfortunately I will have to continue to encode my files myself for Adobe Photo Showcase that I'm using for now ...
Most of the stuff on the web talks about encoding DVD's to divX or xVID. But often I'm just trying to encode video for the web. Sites like the ones I've talked about earlier.
It's difficult to make a choice on the best codecs and settings to use. Of course you can just upload the files as they are if they are from your digital camera - although they may be a little big and for sites that don't convert them they may not stream properly. (Eg my camera takes Quicktime movies - but they aren't enabled for streaming no Hinted Streaming. So if you share them on the web, the whole file is downloaded before they play).
Plus I often capture some DV footage off my camcorder and want to make a clip to share with friends and family. So I decided to do some very un-scientific tests! It's quite difficult to do this keeping all factors the same - for example video / audio bitrate, key frame interval and audio quality, but it's gives me a rough idea. Of course then's there system compatability factors - whether it'll play on Mac's, whether you need to download an additional codec etc etc.
I'm using a Quicktime file off my digital camera which is 15s long. The original file is 640x480 and 15MB. Pretty large for a 15s clip I think you'll agree! First off I'm using Quicktime Pro 6.5 to transcode it to something smaller. For all the clips I'm aiming to end up with a 2MB file which equates to around 1Mbps bitrate.
So in Quicktime I tried a few setting and ended up with selecting ExportMovie to Quicktime MovieUse LAN and then changing the size to 480x360:


To see how it all turned out see the link below:
http://blip.tv/file/300616
(select the various encodings from the drop down box below the video - including the 15MB source file.)
They is a difference between all the streams. Personally I think the Flash encoding looks the worst with some horrible blocking when there's any movement. But the image does look quite clean and sharp. Next up for me is the Quicktime file. It's pretty good - but it does require having Quicktime Pro (around $30 when I bought it). But I think the quality of the Windows Media Encoding is the best. No noteable artifacts - very nice.
However, everything comes at a price. Windows Media Encoder is free but doesn't accept Quicktime files. You need to uncompress them. If you don't have Quicktime Pro you can use the free Rad Video Tools to de-compress the file and then load it into WME. Plus the encoding took 40s for a 15s clip on my PC (Athlon 3000, 1GB RAM). Quicktime is quite nice and easy to use for this clip - but also pretty slow - also 40s. The quickest by a long stretch is Flash encoding - at 8s!!
And then there's the audience viewing your creations - I happen to know most people I send clips of family to have Windows PC's and therefore my encoder of choice is WME. But I'd probably always try to include a Flash encoding too to be safe. Using something like Blip.tv - it's very easy to have mutliple version. And I could have just uploaded the source file and let it encode the Flash file for me. As I've mentioned though - none of the video sharing sites I could find had decent privacy settings to unfortunately I will have to continue to encode my files myself for Adobe Photo Showcase that I'm using for now ...
Screencasts and video encoding for online sharing ...
Thought it's worth making a few notes on how I did the screen captures below. So I don't forget!
Next I tried Microsoft Windows Encoder. This is an excellent application and is very powerful (and also an excellent way to put your dual core processor to work!). The New Session wizard has an option for screen capture and uses a specialist Microsoft screen capture codec for the encoding which does an amazing job even at lower bitrates. Plus you can select an application window. (I still set that window to 800x600) with Auto Window Manager.) Also select capture audio if you want to. Those settings may work perfectly but I was trying to show a high resolution image and the adjustments made to it so upped the bitrate to 500kbps and made the key frame interval 1s. But I did reduce the frame rate to 5 fps to make the most of the 500 kbps. I played around with this a lot - it can be tricky to get the right settings. For most situations you can probably stick with the wizard options.
Windows encoder also installs two usefull utilities: a file editor which can trim a wmv file without re-encoding and a profile editor which can create profiles which can be used in Windows Movie Maker (or here in Vista) (only single pass encodings - not VBR, or peak VBR; only CBR and quality VBR).
For preparing video clips for online video sharing sites I also played around with various encodings. I found these to be the best settings (which I saved as a Windows Movie Maker (save in "program files\movie maker\shared\profiles (need to create that profiles directory in Vista)") and Windows Encoder profile):
First of tried Camstudio which is a very nifty free application for screen recording. It's worth downloading their free lossless codec too - the other ones it comes with are no good. It has to ability to convert the file to Flash format which is very nice. You could also use the Riva FLV Encoder (which is another great free download). It lets you select fullscreen or a screen region but not an application window (yet ...). I find it easiest to use a window resizing application like
Auto Window Manager to make the window size of the screen you want to capture 800x600 say and then select capture "fixed region" and fill out the screen thus:

I had still had varied results with this application capturing something like Photoshop Elements and the effects I was applying. Without the file size being massive.
Next I tried Microsoft Windows Encoder. This is an excellent application and is very powerful (and also an excellent way to put your dual core processor to work!). The New Session wizard has an option for screen capture and uses a specialist Microsoft screen capture codec for the encoding which does an amazing job even at lower bitrates. Plus you can select an application window. (I still set that window to 800x600) with Auto Window Manager.) Also select capture audio if you want to. Those settings may work perfectly but I was trying to show a high resolution image and the adjustments made to it so upped the bitrate to 500kbps and made the key frame interval 1s. But I did reduce the frame rate to 5 fps to make the most of the 500 kbps. I played around with this a lot - it can be tricky to get the right settings. For most situations you can probably stick with the wizard options.
Windows encoder also installs two usefull utilities: a file editor which can trim a wmv file without re-encoding and a profile editor which can create profiles which can be used in Windows Movie Maker (or here in Vista) (only single pass encodings - not VBR, or peak VBR; only CBR and quality VBR).
For preparing video clips for online video sharing sites I also played around with various encodings. I found these to be the best settings (which I saved as a Windows Movie Maker (save in "program files\movie maker\shared\profiles (need to create that profiles directory in Vista)") and Windows Encoder profile):


Wednesday, 11 July 2007
Online video sharing sites
[Edit (31st January 2008) - Vimeo has got some excellent new features. You can have password privacy - so anyone (not just Vimeo users) can view your files if they have a password. Also you can elect to have "download original video" switched off for some video if you like. These two options make Vimeo my fast choice now. Plus they allow 500MB a week / per file and no time limit!]
[Edit - Vimeo's privacy options aren't quite what I thought they were. They only work with other Vimeo members - so anyone you send a private clip to would have to sign up with Vimeo - not so good.]
There are loads of video sharing sites - far more than I realised until I looked at sharing the tutorials below. And they all very in quality, ease of use and features.
I have used Youtube - but the quality is pretty poor to be honest (particuarly noticeable with screencasts like those below). However it's easy to use and you'll get lets of people viewing your creations.
Most of the sites transcode your video to Flash format which is ok at higher bit rates but I think looks awful at low bitrates. Video size varies from 320x240 to 480x360 - which is much much better!
Here's some of my comments on some of the sites I've tried:
Youtube:
Pros
Ease of use; huge audience
Cons
320x240; low video quality; no private option
Brightcove:
Pros
Large 480x360 video size (real advantage); high quality Flash encoding
Cons
No private option
Vimeo:
Pros
Simple to use; private options (personal videos for friends and family) - huge plus for me, fast viewing of uploaded files; good quality Flash encoding; can play source file - also really nice feature (although see cons)
Cons
Can download files - not always sure I'd want this
Blip.tv
Pros
Immediate viewing of files; good quality Flash encoding; supports multiple encodings (will convert to Flash, but you can also view your source file and upload multiple formats eg Quicktime, Windows wmv etc) - this is brilliant; if you encode your video directly to Flash you'll see just this (can get far better quality encoding from original file); full screen option generally looks pretty good (it appears that the Flash conversion is very good quality and size which is squashed in the default window size - full screening shows it off in all its glory); lots of upload options - ftp, desktop tool, direct from Windows Movie Maker (download patch from btlip.tvtools
Cons
No private option; didn't find it so easy to use
Summary:
No one clear winner unfortunately. But I'll prolly use Vimeo for personal video because the quality is good and it has privacy options. And may well use blip.tv for everything else. Brightcove is the best quality if the user is never going to download the original or look at the clip full screen so is good for embedding and such like.
Note that I also tried a few others but these were the best I could find.
Also note that screencasting is probably the hardest thing to show in in small window sizes and most of these sites are more geared up for video clips and films. However it's a good test for quality of encoding. Plus I also tried these sites with video clips to confirm my impressions.
Masking tutorials
Further to my last post here are some tutorials that I've created as an aide memoire.
Monday, 2 July 2007
Layer Masks in Photoshop Elements
Layer Masks are a very handy feature but are a little tricky in Elements. There are a number of ways to achieve them and there's even a Photoshop "action" that you can use to implement the feature fully (which I'll come onto).
Firstly what you're trying to do with a layer mask is to expose or hide chosen areas of another layer which sits above your background layer (or any other layer). For example I may have an image of my son which needs sharpening. I could duplicate this layer (ctrl-j) and sharpen this layer heavily. Then I could paint with a soft brush the areas I actually want to the sharpen using the layer mask (say his eyes). The handy thing is the mask gets saved with the image and you add or delete bits of the mask very easily.
Ok, the first method is to use an Adjustment Layer (AL). Duplicate your bottom layer and make the adjustments you want to this layer. Add any AL - say Hue/Sat above your bottom layer. And then select ok. You will the right thumbnail is the layer mask. This layer should sit between your bottom layer (or background layer) and the layer you have adjusted. Now hold the alt key and click in between the middle and top layer - you'll see the curser change. Now click on the right thumbnail of the adjustment layer. Draw black with the brush to cut through the top layer and show the bottom layer. Draw white to erase any strokes.
Second way is to add an transparent layer in between the two layers (instead of the adjustment layer). Group this the same way with the top modified layer. Now paint with black to expose the top (note this works the other way around to the true layer masks) layer and use the eraser to "paint white". This is the easiest method to use for my initial example.
Lastly download this action:
http://graphicssoft.about.com/od/pselements/p/layermasks.htm
Layer masks are also great for compositing / montages - whatever you want to call them. Probably easier using the free action for this. You can create a layer mask for each image to be montaged. Then either use the gradient tool or a soft brush to merge the pics together.
Another tip is if you only want to expose small areas of the top image using method 1 and three, is to fill the layer mask in black by setting the foreground colour black (D, then X until foreground black), then press Alt-Backspace. Now use the brush tool with the foreground black or eraser tool if using second method and paint the areas from the top image you want exposing. (This is great for sharpening selectively).
Friday, 22 June 2007
GPS Tagging
If like me you have a phone which will tag your pics with GPS data (HP Ipaq 6915) - it can be quite handy to take a batch of pics with your favorite camera at a particular location and then take a GPS tagged one with the phone camera. Then when you get home use Picassa and Google Earth to copy the tag from the tagged pic to the others. Load the pics in Picassa and select the tagged one plus all the others at the same location. Then select menu item "Geotag with Google Earth". In Google earth select "Geotag all" and you're done. I then use Elements 5 for viewing them and further tagging.
Another method I use to tag my photos even more accurately and without having to remember to take a tagged photo is to use Microsoft's WWMX Location Stamper (freeware). Together with almost any GPS device it will correlate the pics you take with any camera with their location data. First sync the times on both devices. Then make sure your GPS device is recording a track in some format or another. Take your pics as normal. When you get home convert the track to GPX format if the file can't already be saved in that format. Use something like GPSBabel. I use Multimap to record the GPS data and it exports to GPX so easy peasy. Then load your photos in Location Stamper and select "Add Track". Find the GPX file and select "Apply Tracks". And seconds later all your photos will be Geotagged. I find the results very accurate indeed.
Another method I use to tag my photos even more accurately and without having to remember to take a tagged photo is to use Microsoft's WWMX Location Stamper (freeware). Together with almost any GPS device it will correlate the pics you take with any camera with their location data. First sync the times on both devices. Then make sure your GPS device is recording a track in some format or another. Take your pics as normal. When you get home convert the track to GPX format if the file can't already be saved in that format. Use something like GPSBabel. I use Multimap to record the GPS data and it exports to GPX so easy peasy. Then load your photos in Location Stamper and select "Add Track". Find the GPX file and select "Apply Tracks". And seconds later all your photos will be Geotagged. I find the results very accurate indeed.
Subscribe to:
Posts (Atom)